With the integration of LM Studio and iTerm2, powered by the cutting-edge DeepSeek LLM, developers can now streamline their workflows. This setup enhances coding efficiency while maintaining complete control over their data.
Running DeepSeek LLM locally offers several benefits:
Enhanced Privacy: Your data stays on your machine, ensuring that sensitive information is not shared with external servers. There’s no need to send data back and forth over the internet.
Customization: You have full control over the model and can fine-tune it to better suit your specific needs and preferences.
Offline Access: You can use the model even without an internet connection, making it more reliable in various situations.
Cost Efficiency: Avoiding cloud service fees can be more economical, especially for extensive or long-term use.
These advantages make running DeepSeek LLM locally a powerful option for developers and users who prioritize privacy.
The following steps show the integration of LM Studio with iTerm2.
LM Studio
Download your preferred LLM and load the Model:
Jump to the Developer screen
Open Settings and set the Server Port to: 11434
Start the Engine
The screen shows now a running service:
Click on the copy-button and close the page
iTerm2
Open the Settings of iTerm2
install the plugin
Enable AI features
enter any API Key (entry is necessary but is not checked locally)
For the first test you can leave the AI Prompt
Use llama3:latest Model
paste the URL copied from LM Studio and add /v1/chat/completions
The final URL is then http://localhost:11434/v1/chat/completions
close the Settings-Windows
Action
-Press command-y in your iTerm2 session -type your question into the windows and press shift-enter to ask your LLM:
Now you can use your local running LLM, even when you switch off your network-adapter 🙂
ssh-audit is a powerful tool designed to help you assess the security of your SSH servers (and clients!). It provides detailed information about the server’s configuration, supported algorithms, and potential vulnerabilities. In this guide, I’ll walk you through the steps to install ssh-audit and run your first security tests. Secure SSH configuration made easy.
Installation on Linux
Clone the Repository: Open your terminal and clone the ssh-audit repository from GitHub: git clone https://github.com/jtesta/ssh-audit.git
Navigate to the Directory: Change to the ssh-audit directory: cd ssh-audit
Install Dependencies: Ensure you have Python installed on your system. If not, install it using your package manager. For example, on Ubuntu: sudo apt-get install python3
Installation on macOS
To install ssh-audit , run: brew install ssh-audit (You have already Brew installed, right ?)
Please check the ssh-audit url for many other setup options (Docker,Windows,etc.)
Test the SSH-Server against vulnerabilities
execute ssh-audit <hostname> Replace <hostname> with the IP address or domain name of the SSH server you want to audit.
Example of Ubuntu’s 24.04 LTS default SSHD setup:
(if you add the -l warn switch you just get the vulnerabilities presented)
Interpreting the Results:ssh-audit will provide a detailed report of the server’s configuration, including supported key exchange algorithms, encryption ciphers, and MAC algorithms. Look for any warnings or recommendations to improve your server’s security.
Remediation
After running ssh-audit and identifying potential vulnerabilities or weak configurations in your SSH server, it’s important to take steps to remediate these issues. Below are examples of how to apply them:
Example for Ubuntu 24.04.1 LTS:
(Note: This is just an example. The example eliminates vulnerabilities for the SSH-daemon, but it can well be that this snippet does not fit for your setup. Handle with care)
This snippet creates a configuration file (51-ssh-harden_202412.conf) in directory /etc/ssh/sshd_config.d/ with the specified settings to enhance the security of your SSH server.
(Note: This is just an example. This example eliminates vulnerabilities for the SSH-daemon, but it can well be that this snippet does not fit for your setup. Handle with care)
# Backup the original OpenSSH server configuration file
cp /etc/crypto-policies/back-ends/opensshserver.config /etc/crypto-policies/back-ends/opensshserver.config.orig
# Update the OpenSSH server configuration with specific cryptographic policies
echo -e "
# Ciphers: Specifies the encryption algorithms used to secure the SSH session
Ciphers=aes256-gcm@openssh.com,aes128-gcm@openssh.com,aes256-ctr,aes192-ctr,aes128-ctr

# Message Authentication Codes (MACs): Defines the algorithms used to ensure data integrity and authenticity
MACs=hmac-sha2-256-etm@openssh.com,hmac-sha2-512-etm@openssh.com,umac-128-etm@openssh.com

# GSSAPI Key Exchange Algorithms: Specifies the algorithms used for GSSAPI key exchange
GSSAPIKexAlgorithms=gss-curve25519-sha256-

# Key Exchange Algorithms (KexAlgorithms): Lists the algorithms used for key exchange during the SSH handshake
KexAlgorithms=curve25519-sha256,curve25519-sha256@libssh.org,diffie-hellman-group16-sha512,diffie-hellman-group18-sha512,diffie-hellman-group-exchange-sha256

# Host Key Algorithms: Lists the algorithms used for verifying the server's host key
HostKeyAlgorithms=ssh-ed25519,ssh-ed25519-cert-v01@openssh.com,rsa-sha2-256,rsa-sha2-512

# Public Key Accepted Key Types: Specifies the types of public keys accepted for authentication
PubkeyAcceptedKeyTypes=ssh-ed25519,ssh-ed25519-cert-v01@openssh.com,rsa-sha2-256,rsa-sha2-512
" > /etc/crypto-policies/back-ends/opensshserver.config
(SSHD restart required)
Proof the remediation
run ssh-audit again!
Example-output after remediation:
How can I test if my SSH-Client is not vulnerable ?
If you run ssh-audit with the switch -c it creates an ssh-service on port 2222 and audits every connection attempt:
output after the login-attempt (ssh 127.0.0.1 -p 2222)
➜  ~ ssh-audit -c
# general
(gen) client IP: 127.0.0.1
(gen) banner: SSH-2.0-OpenSSH_9.8
(gen) software: OpenSSH 9.8
(gen) compression: enabled (zlib@openssh.com, zlib)

# key exchange algorithms
(kex) sntrup761x25519-sha512@openssh.com           -- [info] available since OpenSSH 8.5
                                                   `- [info] default key exchange from OpenSSH 9.0 to 9.8
                                                   `- [info] hybrid key exchange based on post-quantum resistant algorithm and proven conventional X25519 algorithm
(kex) curve25519-sha256                            -- [info] available since OpenSSH 7.4, Dropbear SSH 2018.76
                                                   `- [info] default key exchange from OpenSSH 7.4 to 8.9
(kex) curve25519-sha256@libssh.org                 -- [info] available since OpenSSH 6.4, Dropbear SSH 2013.62
(kex) diffie-hellman-group-exchange-sha256         -- [info] available since OpenSSH 4.4
(kex) diffie-hellman-group16-sha512                -- [info] available since OpenSSH 7.3, Dropbear SSH 2016.73
(kex) diffie-hellman-group18-sha512                -- [info] available since OpenSSH 7.3
(kex) ext-info-c                                   -- [info] available since OpenSSH 7.2
                                                   `- [info] pseudo-algorithm that denotes the peer supports RFC8308 extensions
(kex) kex-strict-c-v00@openssh.com                 -- [info] pseudo-algorithm that denotes the peer supports a stricter key exchange method as a counter-measure to the Terrapin attack (CVE-2023-48795)

# host-key algorithms
(key) ssh-ed25519-cert-v01@openssh.com             -- [info] available since OpenSSH 6.5
(key) sk-ssh-ed25519-cert-v01@openssh.com          -- [info] available since OpenSSH 8.2
(key) rsa-sha2-512-cert-v01@openssh.com            -- [info] available since OpenSSH 7.8
(key) rsa-sha2-256-cert-v01@openssh.com            -- [info] available since OpenSSH 7.8
(key) ssh-ed25519                                  -- [info] available since OpenSSH 6.5, Dropbear SSH 2020.79
(key) sk-ssh-ed25519@openssh.com                   -- [info] available since OpenSSH 8.2
(key) rsa-sha2-512                                 -- [info] available since OpenSSH 7.2
(key) rsa-sha2-256                                 -- [info] available since OpenSSH 7.2, Dropbear SSH 2020.79

# encryption algorithms (ciphers)
(enc) chacha20-poly1305@openssh.com                -- [info] available since OpenSSH 6.5, Dropbear SSH 2020.79
                                                   `- [info] default cipher since OpenSSH 6.9
(enc) aes128-ctr                                   -- [info] available since OpenSSH 3.7, Dropbear SSH 0.52
(enc) aes192-ctr                                   -- [info] available since OpenSSH 3.7
(enc) aes256-ctr                                   -- [info] available since OpenSSH 3.7, Dropbear SSH 0.52
(enc) aes128-gcm@openssh.com                       -- [info] available since OpenSSH 6.2
(enc) aes256-gcm@openssh.com                       -- [info] available since OpenSSH 6.2

# message authentication code algorithms
(mac) umac-128-etm@openssh.com                     -- [info] available since OpenSSH 6.2
(mac) hmac-sha2-256-etm@openssh.com                -- [info] available since OpenSSH 6.2
(mac) hmac-sha2-512-etm@openssh.com                -- [info] available since OpenSSH 6.2


# algorithm recommendations (for OpenSSH 9.8)
(rec) -ecdh-sha2-nistp256                          -- kex algorithm to remove
(rec) -ecdh-sha2-nistp384                          -- kex algorithm to remove
(rec) -ecdh-sha2-nistp521                          -- kex algorithm to remove
(rec) -ecdsa-sha2-nistp256                         -- key algorithm to remove
(rec) -ecdsa-sha2-nistp256-cert-v01@openssh.com    -- key algorithm to remove
(rec) -ecdsa-sha2-nistp384                         -- key algorithm to remove
(rec) -ecdsa-sha2-nistp384-cert-v01@openssh.com    -- key algorithm to remove
(rec) -ecdsa-sha2-nistp521                         -- key algorithm to remove
(rec) -ecdsa-sha2-nistp521-cert-v01@openssh.com    -- key algorithm to remove
(rec) -hmac-sha1                                   -- mac algorithm to remove
(rec) -hmac-sha1-etm@openssh.com                   -- mac algorithm to remove
(rec) -sk-ecdsa-sha2-nistp256-cert-v01@openssh.com -- key algorithm to remove
(rec) -sk-ecdsa-sha2-nistp256@openssh.com          -- key algorithm to remove
(rec) -diffie-hellman-group14-sha256               -- kex algorithm to remove
(rec) -hmac-sha2-256                               -- mac algorithm to remove
(rec) -hmac-sha2-512                               -- mac algorithm to remove
(rec) -umac-128@openssh.com                        -- mac algorithm to remove
(rec) -umac-64-etm@openssh.com                     -- mac algorithm to remove
(rec) -umac-64@openssh.com                         -- mac algorithm to remove
Make your SSH-communication more secure, if not the SSH-Service opens an attack surface for uninvited visitors. Secure SSH configuration is Key!
Managing apps on your Mac can sometimes feel like a chore, especially when you have to manually update, install, or remove them.
Enter MAS (Mac App Store command line interface), a powerful tool that simplifies these tasks and more. In this blog post I explore how MAS can make your life easier and why you should consider adding it to your toolkit.
What is MAS?
MAS is a command-line interface for the Mac App Store, allowing you to manage your apps directly from the terminal. With MAS, you can search for, install, update, and remove apps without ever opening the App Store. This can be particularly useful for developers, system administrators, or anyone who prefers using the terminal for their workflows.
Installing MAS
Before you can start using MAS, you’ll need to install it. The easiest way to do this is through Homebrew, a popular package manager for macOS. If you don’t have Homebrew installed yet, you can install it by running the following command in your terminal:
Once Homebrew is installed, you can install MAS with the following command:
brew install mas
Benefits of Using MAS
Efficiency: MAS manage your apps quickly and efficiently from the terminal. No more clicking through the App Store interface—just type a few commands, and you’re done.
Automation: With MAS, you can script your app management tasks. This is particularly useful for setting up new machines or maintaining multiple systems.
Consistency: Using MAS ensures that your app management process is consistent across all your devices. You can easily replicate the same setup on different machines.
Control: MAS gives you more control over your app management. You can see detailed information about your installed apps and manage them in a way that suits your needs.
Disadvantages of the Old App Store App
App Store App
While the App Store app on macOS has its merits, it also comes with several disadvantages:
Cumbersome Interface: The graphical interface can be slow and cumbersome, especially when managing multiple apps. Navigating through various menus and options can be time-consuming.
Lack of Automation: The App Store app does not support automation, making it difficult to script repetitive tasks. This can be a significant drawback for users who need to manage multiple devices or frequently install and update apps.
Limited Control: The App Store app provides limited control over app management. Users cannot easily access detailed information about installed apps or manage them in bulk.
Inconsistent Performance: The performance of the App Store app can be inconsistent, with occasional slowdowns and crashes. This can be frustrating, especially when trying to quickly install or update apps.
Getting Started with MAS
Here are a few basic commands to get you started with MAS:
Search for an app: mas search <app-name>
Install an app: mas install <app-id>
List installed apps: mas list
Update all apps: mas upgrade
Remove an app: mas uninstall <app-id>
Example to upgrade your current installed apps:
┌──(ugu5ma㉿iMacPro)-[~]
└─$ mas upgrade
Upgrading 8 outdated applications:
Final Cut Pro (10.8.1) -> (11.0)
Microsoft PowerPoint (16.90.2) -> (16.91)
Motion (5.8) -> (5.9)
iMovie (10.4.2) -> (10.4.3)
Microsoft Remote Desktop (10.9.10) -> (11.0.6)
Logic Pro (11.0.1) -> (11.1)
Compressor (4.8) -> (4.9)
Microsoft Word (16.90.2) -> (16.91)
==> Downloaded Final Cut Pro (11.0)
==> Installing Final Cut Pro (11.0)
==> Installed Final Cut Pro (11.0)
==> Downloading Microsoft PowerPoint (16.91)
==> Downloaded Microsoft PowerPoint (16.91)
==> Installing Microsoft PowerPoint (16.91)
==> Installed Microsoft PowerPoint (16.91)
==> Downloading Motion (5.9)
==> Downloaded Motion (5.9)
==> Installing Motion (5.9)
==> Installed Motion (5.9)
==> Downloading iMovie (10.4.3)
==> Downloaded iMovie (10.4.3)
==> Installing iMovie (10.4.3)
==> Installed iMovie (10.4.3)
==> Downloading Windows App (11.0.6)
==> Downloaded Windows App (11.0.6)
==> Installing Windows App (11.0.6)
==> Installed Windows App (11.0.6)
==> Downloading Logic Pro (11.1)
==> Downloaded Logic Pro (11.1)
==> Installing Logic Pro (11.1)
==> Installed Logic Pro (11.1)
==> Downloading Compressor (4.9)
==> Downloaded Compressor (4.9)
==> Installing Compressor (4.9)
==> Installed Compressor (4.9)
==> Downloading Microsoft Word (16.91)
==> Downloaded Microsoft Word (16.91)
==> Installing Microsoft Word (16.91)
==> Installed Microsoft Word (16.91)

┌──(ugu5ma㉿iMacPro)-[~]
└─$
For a full list of commands and options, you can check the MAS documentation.
MAS is a powerful tool that can save you time and effort when managing your Mac apps. Whether you’re a developer, a system administrator, or just someone who loves the terminal, MAS is worth checking out. Give it a try and see how it can streamline your app management process.
To be able to copy files over from iPad to Samba-shares the enhanced compatibility with Apple SMB clients and interoperability with Netatalk 3 AFP fileserver must be enabled.
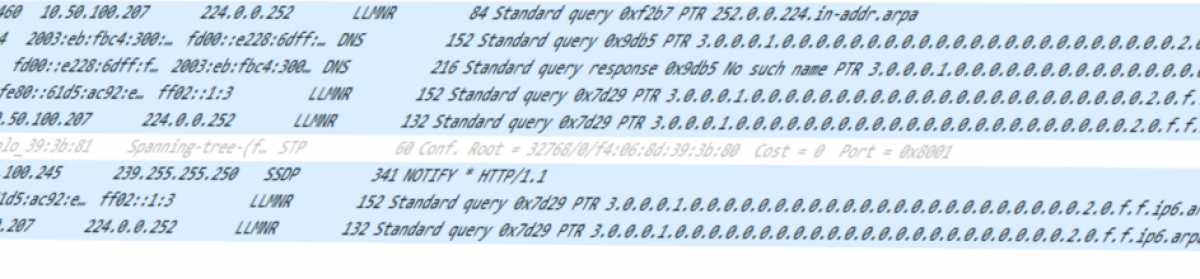
Vfs-module is typically missing if you see in tshark messages like:


You must be logged in to post a comment.